microdot end of support 2023
  • Aug, Tue, 2023

Saying Goodbye to Old Tech: Microsoft’s End of Support for 2023 

Saying Goodbye to Old Tech: Microsoft's End of Support for 2023

In a digital landscape that’s constantly evolving, staying up-to-date with technology is imperative. Microsoft, a global tech giant, has recently made a significant announcement that’s sending waves through the tech community. As of 2023, the company will officially end support for a range of products, marking the end of an era for several beloved software offerings. This decision isn’t just a routine update—it’s a pivotal moment that will impact users, businesses, and the technology ecosystem at large.

microdot end of support 2023

The Changing Tech Landscape: A Farewell to Familiar Faces

Change is inevitable, especially in the tech world. Microsoft’s decision to end support for multiple products is a testament to the company’s commitment to pushing boundaries and embracing innovation. 

The following products will reach end of support in 2023:

  1. Windows 8.1 and Windows Embedded 8.1 Pro
  2. Windows Defender for Windows 8 and Windows 8.1
  3. Windows RT
  4. Windows Embedded 8 Standard and Windows Embedded 8.1 Industry
  5. Windows Embedded Standard 7 (Year 3 of ESU support)
  6. Windows 10 version 20H2 Enterprise and Education editions
  7. Windows 10 version 21H2 Home and Pro editions
  8. Windows 11 version 21H2 Home and Pro editions
  9. Microsoft Dynamics 365
  10. Microsoft Office
  11. Microsoft SQL Server
  12. Microsoft Visio
  13. Microsoft Visual Studio
  14. Microsoft Windows
  15. Microsoft Windows Server

The Implications of End of Support: Why It Matters

The end of support for these products isn’t just a routine update; it’s a call to action for users and organizations alike. When a product reaches the end of its support lifecycle, it means that Microsoft will no longer provide security updates, technical support, or essential software updates. This leaves users vulnerable to security threats and compatibility issues, which could have a far-reaching impact on the overall integrity of systems and data. The decision to end support is a proactive move to encourage users to upgrade to more modern and secure alternatives, safeguarding their digital experiences.

Mitigating Risks and Embracing Opportunities:

While change might seem daunting, it also brings opportunities for growth and improvement. Microsoft’s decision to end support isn’t a roadblock; it’s a stepping stone towards better, more secure digital experiences. Users are encouraged to seize this moment as a chance to upgrade to supported product versions. Microsoft offers a range of tools and resources that facilitate the upgrade process, ensuring a smooth transition. Embracing these opportunities will not only enhance security but also unlock new features and functionalities that are designed to make digital workflows more efficient and seamless.

Looking Ahead: A Secure and Dynamic Future

As we bid farewell to these products, we’re also ushering in a new era of technology. Microsoft’s decision to end support underscores the company’s commitment to staying ahead of the curve and embracing innovation. This move empowers users to make informed decisions about their digital experiences, ultimately leading to a more secure and dynamic future. By upgrading to supported products, users can enjoy enhanced security, compatibility with newer software and hardware, and a wealth of features that keep pace with the ever-evolving tech landscape.

Change is a constant in the tech world, and Microsoft’s announcement about the end of support for various products in 2023 is a testament to that fact. While it might be bittersweet to say goodbye to these familiar tools, it’s also an exciting opportunity to embrace newer, more secure options. As users transition to supported product versions, they’re not just upgrading their software—they’re upgrading their digital experiences, ensuring a safer and more efficient technological journey into the future. So, let’s bid a fond farewell to the old and welcome the new with open arms, as we navigate the ever-changing seas of technology together.

Empty bin
  • Aug, Mon, 2023

Schedule Windows to Automatically Empty Recycle Bin

Schedule Windows to Empty Recycle Bin Automatically

Are you tired of the clutter in your Recycle Bin? Is manual emptying becoming a repetitive chore? We have a solution for you! With the Windows Task Scheduler, you can automate the process of emptying your Recycle Bin, ensuring your computer stays organized without any effort from your side.

Empty bin

Follow these simple steps to schedule your Windows system to automatically empty the Recycle Bin:

1. Open Task Scheduler Press the Windows Key + R, and then type taskschd.msc to open the Task Scheduler.

2. Create a Basic Task Under the “Action” category, click on the option “Create Basic task.”

3. Set Task Name and Description In the Task Creation Wizard, provide a Name for the Task and an optional Description. Click the “Next” button to proceed.

4. Choose Time Interval Select the desired time interval for the Task from the given options. Click “Next.”

5. Configure Task Actions Continue setting up the task until you reach the screen where you’ll define the action.

6. Running the Empty Recycle Bin Script On the next screen, type cmd.exe in the Program/Script field. In the “Add Arguments” field, paste the following command: /c "echo Y|PowerShell.exe -NoProfile -Command Clear-RecycleBin"

7. Review and Finish Review all your settings and click the “Finish” button.

8. Test the Scheduled Task To check the Scheduled Task, select the task from the main window of Task Scheduler and then click “Run.” Watch as your Recycle Bin gets automatically emptied!

Step-by-Step Guide: Using Task Scheduler for Automated Recycle Bin Emptying

With just a few simple steps, you can free yourself from the task of manually emptying the Recycle Bin. Let your computer do the work for you with the Task Scheduler. Enjoy a cleaner and more organized digital space effortlessly.

Start now and experience the convenience of an automatically emptied Recycle Bin on your Windows system!

wifi
  • Aug, Mon, 2023

How to Keep Your Router & WiFi Safe From Intruders: 10 Essential Tips

10 Essential Tips to Secure Your Router and WiFi Network

As we navigate through the digital age, it’s crucial to prioritize the security of our routers and WiFi networks. With cyber threats constantly on the rise, we must take proactive steps to protect our personal information. By following these 10 essential tips, you can strengthen the security of your network and keep unauthorized individuals at bay.

wifi

The first tip is to adjust your router’s settings. By changing the default admin username and password to something unique and complex, you create an additional layer of protection. Remember to use a combination of upper and lowercase letters, numbers, and special characters for a strong password.

Customize Your WiFi Name

Next, consider customizing your WiFi name. Hackers often target networks with generic names, so by giving your WiFi network a distinct and unique name, you make it harder for intruders to identify and gain access.

Disable Network Name Broadcasting

Another important step is disabling network name broadcasting. By default, routers broadcast their network names, making it easier for devices to connect. However, this also makes it easier for hackers to identify and potentially target your network. By disabling network name broadcasting, you hide your WiFi network from unauthorized individuals and increase its security.

Enable Network Encryption

Enabling network encryption is crucial for protecting the data transmitted between your devices and the router. Choose the most advanced encryption protocol available, such as WPA2 or WPA3, to add an extra layer of security to your network.

Enable Network Encryption

If you frequently have guests requiring WiFi access, setting up a guest network is a smart move. By doing so, you keep your guests separated from your main network, preventing them from accessing sensitive files or devices.

Check Your Router’s Firewall

Check your router’s firewall to ensure it is enabled and properly configured. A firewall acts as a barrier between your network and potential threats, providing an additional layer of security. Consult your router’s user manual or contact your service provider for guidance on setting up your firewall.

Use Virtual Private Networks (VPNs)

Consider using Virtual Private Networks (VPNs) for enhanced security. VPNs encrypt your internet traffic and create a secure connection between your device and the internet, making it difficult for hackers to intercept your data. Use a reputable VPN service, especially when accessing sensitive information or connecting to public WiFi networks.

Regularly Update Your Router and Devices

Regularly check for software updates for your router and apply them promptly. Software updates often include important security patches that fix vulnerabilities and improve overall performance. Additionally, keep your devices and computers updated to enhance network security.

Consider Turning Off Your Router When Offline

If you’re going to be offline for an extended period, consider turning off your router. This simple step adds an extra layer of protection by keeping everyone out of your network. However, be mindful of the needs of others in your home who may require constant internet access.

Invest in a New Router

Finally, consider investing in a new router if your current one is outdated or no longer receives firmware updates. Newer models often come equipped with advanced security features and better network performance, reducing the risk of unauthorized access.

Conclusion: Enhance Your Network's Security Today

In conclusion, securing your router and WiFi network should be a top priority in today’s digital landscape. By following these 10 essential tips, you can significantly enhance the security of your network and protect your personal information. Take action now to safeguard your router and WiFi from potential threats. Remember: prevention is always better than a security breach. Stay safe online!

  • Aug, Sat, 2023

Effective Solutions for Computer Virus and Malware Infections

Handling a Virus or Malware Infection on Your Computer

Since establishing my computer repair service several years ago, I’ve encountered various computers infected with viruses or other malware. A common denominator among these situations is that users often didn’t realize how their computers got infected. This article explores steps you ought to take when you suspect your computer has been compromised.

Virus

Detecting if Your Computer is Infected

The signs of a computer virus or the presence of other malware may vary, but here are common symptoms I’ve dealt with:

– The computer running exceptionally slowly.
– Unexpected pop-up screens.
– Difficulty establishing an internet connection.
– Computers issuing warnings or exhibiting unusual activities.

While these symptoms are typical, there are other signs to watch out for. Irregular computer behavior usually signifies possible malware infection. A case in point I encountered was an iMac that was selectively connecting to particular websites, due to the presence of malware.

Understanding How Your Computer Gets Infected

Computers can be infected with viruses or malware, either conspicuously or subtly. An overt example is ransomware, usually activated by clicking on an email attachment, which locks your files and demands payment to restore access.

Typically, malware infiltrates computers through unsolicited emails, by visiting infected sites, or during the installation of other software. Unwitting installations happen when people proceed with software installations without scrutinizing prompts about additional software.

Getting Rid of Malware from Your Computer

The main malware removal strategies are via anti-malware software scans or reinstallation of the computer’s operating system.

Anti-malware Software
Using multiple respected anti-malware tools simultaneously enhances the chances of detecting and eliminating malware.

My personal preferences are:

Malwarebytes – offers comprehensive malware and spyware removal.

Bitdefender – offers comprehensive antivirus and anti-malware protection. It can scan for any potential threats in your system, block dangerous websites, and protect against phishing and fraud attacks. It also provides advanced threat defense through behavioral detection technology. Bitdefender can also offer multi-layer ransomware protection, privacy Firewall, VPN, and parental control features.

Kaspersky – provides real-time protection against various types of malware. It can perform network attack blocking, automatic updates, and system scans for threats. Kaspersky also offers features such as anti-phishing, email spam filtering, and protection of your online privacy. With its Safe Money feature, it ensures secure online transactions. Kaspersky software also provides parental controls, password management, file encryption, and backup utilities.

To rev up performance when conducting scans, it’s advisable to update to the latest versions, boot into safe mode, and use disk cleanup tools. Download RKill to terminate known malware processes for efficient scanning. It’s also advisable to disable any existing anti-virus software during the scan.

Reinstalling Windows
For a guaranteed eradication of viruses or malware, erasing your hard drive and reinstalling the operating system is advisable.

In Conclusion
Once you’ve undertaken either of the malware removal methods, your computer should be functioning optimally. You may choose to uninstall or upgrade the anti-malware software used, or retain default protection provided by Microsoft Defender Antivirus for Windows 10/11 users, and use the scanners as necessary.

  • Aug, Fri, 2023

How to Check the Maximum RAM Capacity of Your Computer

How to Check the Maximum RAM Capacity of Your Computer

Are you looking to upgrade the RAM on your computer for improved performance? Before you do, it’s essential to understand the maximum RAM capacity that your computer can handle. By knowing this information, you can ensure that you don’t add more RAM than your system can support. In this blog post, we will guide you through the steps to check the maximum RAM capacity of your computer, whether it’s a laptop or desktop.

Step-by-Step Guide to Checking Maximum RAM Capacity

Accessing the Command Prompt

To begin, you’ll need to open the Command Prompt on your computer. Press the Windows key and R simultaneously to open the Run dialog box. Type “cmd” in the search box and press Enter. This will open the Command Prompt window, where you can enter the necessary command to check your computer’s maximum RAM capacity.

Using CMD to Check Maximum RAM Capacity

Once the Command Prompt window is open, type the command “wmic memphysical get maxcapacity” and press Enter. This command will query your computer’s memory subsystem and display the maximum capacity of RAM in kilobytes. To convert this value to gigabytes, simply divide the result by 1024. For example, if the maximum capacity displayed is 4096000 kilobytes, you can calculate that your computer can handle up to 4 gigabytes of RAM.

check-maximum-ram-capacity

Understanding the Importance of Maximum RAM Capacity

Knowing the maximum RAM capacity of your computer is crucial for several reasons. First, it prevents you from purchasing and installing more RAM than your system can utilize effectively, saving you time and money. Additionally, it ensures that you optimize your computer’s performance by providing it with the right amount of memory it can handle.

Why Knowing the Maximum Capacity is Important

Insufficient RAM can severely impact your computer’s performance. If your system is operating beyond its maximum RAM capacity, it may experience sluggishness, frequent crashes, or an inability to run multiple programs simultaneously. By understanding your computer’s limits, you can decide whether upgrading your RAM is necessary.

The Impact of Insufficient RAM on Performance

Insufficient RAM can lead to decreased productivity and frustration while using your computer. With limited RAM, your computer may struggle to handle memory-intensive tasks such as video editing, gaming, and running virtual machines. Upgrading your RAM to the maximum capacity can significantly improve performance and ensure smoother multitasking.

Benefits of Upgrading RAM to Maximum Capacity

By upgrading your RAM to the maximum capacity supported by your computer, you unlock a host of benefits. With more memory available, you can effortlessly run resource-intensive applications, experience faster response times, and enjoy seamless multitasking. Whether you’re a professional looking to enhance your productivity or a gamer seeking smooth gameplay, increasing your RAM capacity can have a significant impact.

In conclusion, checking the maximum RAM capacity of your computer is essential before considering a RAM upgrade. By following the simple steps outlined in this guide, you can determine the maximum amount of RAM your system can handle. Avoid the pitfalls of insufficient RAM and optimize your computer’s performance by adding the right amount of memory. Upgrade your RAM today and unlock the full potential of your computer.

  • Aug, Thu, 2023

The Importance of Secure Passwords and 2FA in the Age of Data Breaches

Safeguarding Your Online Accounts with Strong, Unique Passwords and Two-Factor Authentication (2FA)

In today’s digital age, we each have multiple online accounts that require distinct passwords. As data breaches become increasingly frequent, reusing passwords presents a significant cybersecurity risk. In recent years, billions of data records have been lost or stolen in prolific hacking incidents.

2fa

Safeguarding Your Online Accounts with Strong, Unique Passwords and 2FA

Just this year, hackers circulated a staggering collection of 2.2 billion unique usernames and passwords, posing a significant cybersecurity threat. Given these occurrences, it’s plausible that at least one of your accounts could have been impacted.

Should an unwanted party try to access your account before you’ve had the opportunity to change your password, two-factor authentication, or 2FA, would be your saving grace. 2FA adds an extra authentication level during the login process, providing an additional layer of security.

Safeguarding Your Online Accounts with Strong, Unique Passwords and 2FA

There are several common forms of 2FA, including a one-time use code sent via SMS or email, security questions, time-based, one-time passwords (TOTP), hardware authentication devices like YubiKey, and biometric data like iris scans or fingerprints. Each has its pros, cons, and varying levels of vulnerability.

Even if you enable 2FA, maintaining vigilance is crucial as hackers are becoming more sophisticated in their methods, including the use of accurate phishing pages.

Safeguarding Your Online Accounts with Strong, Unique Passwords and Two-Factor Authentication

Our top tips for bolstering your online security include: creating unique usernames and complex, randomly-generated passwords for all accounts, utilizing a password manager such as KeePass or BitWarden, enabling 2FA, researching services that offer 2FA, using open-source and peer-reviewed authenticator apps, using temporary email services for non-essential accounts, not sharing excessive personal information with online platforms, utilizing “Have I Been Pwned?” to check if your accounts have been breached, deleting any non-used accounts, and checking if a service lets you delete your account at any time.

Optimizing your online security demands ongoing vigilance, up-to-date information, and the right tools. Stay protected with our comprehensive guide to password and 2FA security.

  • Aug, Wed, 2023

How To Optimize Windows 11 for a faster startup

In our digitally active world, slow startup times on our computers can be a significant source of frustration. Thankfully, with Windows 11, there are several tips and tricks one can use to significantly improve startup times.

Windows 11

Utilizing Fast Startup on Windows 11

Windows 11 comes with a handy feature known as Fast Startup. This feature may be pre-activated in some computers, but if you are unsure whether it is enabled on your computer, these steps will help.

When you turn on your computer, you immediately want access to your files. But your Windows computer takes so long that you may have enough time to get two cups of coffee and still have to wait. The good news is that there are different methods you can try to help speed things up when booting your computer. So the next time you turn on your computer, you can get things done as soon as possible and get rid of what is making your computer slow.

How to Turn on Fast Startup on Windows 11

Some computers may already have Fast Startup enabled. However, if you are uncertain whether this feature is activated on your device, you can follow these guidelines to confirm or activate it. Start by looking for the Control Panel using the search bar.

Control Panel Search Result

Once the Control Panel opens, navigate the following sequence:

– System and security
– Power options
– Adjust what the power buttons do
– Modify unavailable settings

In the shutdown settings section, you should see the “Turn on Fast Startup” option. This feature can be activated by ticking the box next to it and saving the changes. You might be tempted to take a shortcut such as Control Panel > System and Security > Adjust what the power buttons do. However, you may find the “Turn on Fast Startup” option to be inactive or greyed out. By using the longer navigational route previously outlined, you can ensure it will be available for activation.

How to Disable Startup Programs in Windows 11

One significant culprit for slow boot times is unnecessary startup programs, which automatically start every time you boot up your computer. By disabling these, you can substantially improve your startup times.

– You can do this by utilizing the ‘Task Manager.’
– Press ‘Ctrl + Shift + Esc’ to open it.
– Navigate to the ‘Startup’ tab. Here, you can see a list of all the programs that run at startup. You can disable unnecessary ones.

Update Windows to Speed It Up

Maintaining the current updates on your Windows PC is advisable. This ensures you receive the most recent patches, and a pending update might even improve your device’s performance. To check for outstanding updates, you need to access your settings, which can be done by pressing the Windows + I keys or clicking on the Windows Start menu and then selecting settings.

Upon reaching the settings, select the Windows Update option, then click on the Check for Updates button situated on the top right. Windows will begin searching for any pending updates. If any are available, click on the Download and Install button.

By implementing these simple strategies, you have the power to improve your computer’s startup time significantly. So the next time you turn on your Windows 11 computer, you can enjoy a quicker, more efficient startup and start working or playing immediately.

  • Jul, Thu, 2023

Introduction to Email Protocols: SMTP, IMAP, and POP3

Understanding Email Protocols: SMTP, IMAP, and POP3

email-protocols-smtp-imap-pop3

Nowadays, emails have become an indispensable means of communication in both personal and professional spaces. Integral to how emails function are certain protocols, namely the Simple Mail Transfer Protocol (SMTP), Internet Message Access Protocol (IMAP), and Post Office Protocol version 3 (POP3). These rules or guidelines dictate how emails are sent, received, and stored. Let’s delve deeper and illuminate these foundational elements.

SMTP (Simple Mail Transfer Protocol) - The Outgoing Protocol

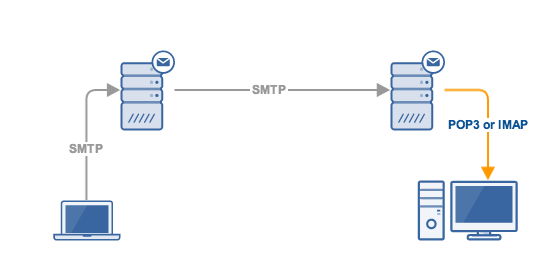
SMTP, known as the protocol for outgoing mail, works by sending your email to the server, which the recipient’s client then retrieves using IMAP or POP3. Typically, SMTP uses port 25, while the secure version operates through port 465.

How SMTP Works

When you hit the send button, SMTP springs into action, transferring your email to the intended server. Whether it’s a simple text email or one rife with attachments, SMTP plays a crucial role in getting your message across.

IMAP: For Efficient Email Management

The current version of IMAP in use is the fourth iteration. It works efficiently by downloading a copy of emails while retaining the originals on the server. The standard version of IMAP uses port 143, while the secure version uses port 993.

Advantages and Use of IMAP

IMAP has many advantages. It’s especially useful when you are using multiple devices to access your email. Since a copy of the received emails remains on the server, you can access it from different devices without issues.

POP3: The Basic Email Retrieval Protocol

While IMAP downloads a copy of emails, POP3 operates differently. It pulls emails down while deleting them from the server. POP3 does not handle multiple devices well. In terms of ports, POP3 uses port 110, and its secure version uses port 995.

Why POP3 May Not Be Ideal

POP3 method becomes inefficient if you often use more than one device to access your emails. As POP3 deletes the original email from the server after download, it poses challenges when trying to access emails from different devices.

Before the SMTP vs IMAP vs POP3 debate confuses you further, it’s crucial to note that these protocols are not in competition but work together to ensure smooth email communication from the sender to the recipient. Your understanding of these protocols guides you in optimizing your device’s email settings to meet your communication needs.

  • Jul, Sat, 2023

Step-by-Step Guide: Installing Google Chrome via Terminal in Kali Linux

How to Install Google Chrome from Terminal in Kali Linux

Ever wondered how to install one of the most used web browsers, Google Chrome, via a terminal in Kali Linux? If your answer is yes, then you’ve arrived at the right place! This guide will give you a systematic walkthrough on how to easily install Google Chrome using the terminal command line in Kali Linux.

Understanding the Basics of Terminal in Kali Linux

Before diving into the installation process, let’s get ourselves familiar with the basics. Kali Linux, originally designed for digital forensics and penetration testing, is a Debian-derived Linux distribution, whereas a terminal, or a command line, is a text-based interface for Linux distributions. Working with the terminal can seem complicated but it’s actually a powerful and in-depth tool for using Linux, offering more flexibility and control.

Steps for Installing Google Chrome via Terminal in Kali Linux

#### Update your system
It’s a good practice to start with updating your system. Open the Terminal, and input the following command:
“`
sudo apt-get update
“`
Let the system complete updating.

#### Download Google Chrome
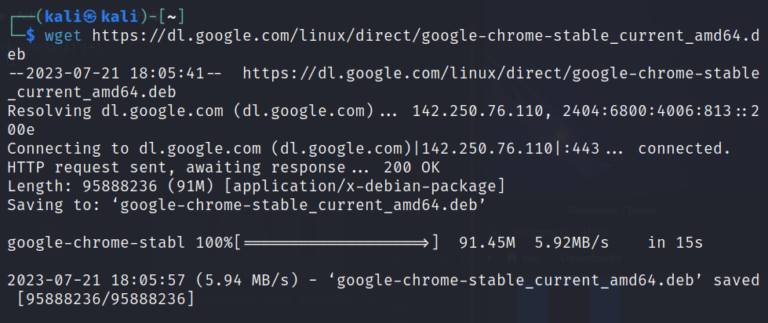
Next, download the Chrome package using the wget command as follows:
“`
wget https://dl.google.com/linux/direct/google-chrome-stable_current_amd64.deb
“`
Sit back and let the system download the package.

#### Install the Google Chrome Package
Once the download is complete, install it using the dpkg command as follows:
“`
sudo dpkg –i google-chrome-stable_current_amd64.deb
“`
If you get any dependency errors, don’t worry – we will fix them in the next step.

#### Fixing dependency errors
To fix the dependency errors, input the following command:
“`
sudo apt install -f
“`
Wait while the system downloads and installs the required dependencies.

Congratulations! By now, you should have successfully installed Google Chrome on your Kali Linux. To open Google Chrome, simply type ‘google-chrome’ in the terminal.

How to Install Google Chrome from Terminal in Kali Linux

Troubleshooting Tips for Google Chrome Installation in Kali Linux

Sometimes, you may encounter installation issues, mostly due to network problems or interruptions during the installation process. If you encounter these issues, don’t feel overwhelmed. Most issues can be fixed simply by restarting the process from downloading the Google Chrome package.

That’s it! This guide got you through the steps for installing Google Chrome via Terminal in Kali Linux. Harness the power of the terminal – it may seem intricate but has much to offer to optimise your Linux experience. Enjoy browsing on Google Chrome on your Kali Linux system!

  • Jul, Thu, 2023

Understanding Linux Drives and Partitions: A Simple Guide

An Introductory Guide to Linux Drives and Partitions

Linux, a highly-utilized open-source operating system, offers its unique way of handling drives and partitions, much differently than Windows and other operating systems. Essentially, what stands out is Linux’s unified file system where drives and resources appear as files. This ensures the naming conventions remain consistent regardless of how many drives, partitions, or directories there are.

If you have a single drive present, it will be represented as ‘/dev/sda’. Here, ‘sd’ signifies the ‘SCSI disk device’, while ‘a’ refers to the first device, hence drive 1. Similarly, if there is a second drive, it will be represented as ‘/dev/sdb’, where ‘b’ signifies that it is the second device, thus drive 2.

When it comes to partitions in Linux, they are recognized by appending a numeric value in the identifier. For instance, the first partition on your first drive would be displayed as ‘/dev/sda1’. If a second partition exists, it will be shown as ‘/dev/sda2’, and so on.

Fundamentals of Understanding Linux Drives and Partitions

Delimiters are fundamental in file paths; hence Linux uses the forward slash “/”, unlike Windows uses the backward slash “\”. This forward slash helps divide the disk names and partition numbers, offering a clear view of your disk organization.

In Linux, the forward slash (‘/’) is used as a delimiter. Interestingly, unlike Windows, which uses a backward slash (‘\’), Linux recognizes all resources as part of a Unified File System.

To access specific devices or partitions in your drive, Linux uses mounting. For instance, if you need to mount the second partition on the first drive, you can use the command ‘mount /dev/sda2 /mnt/your_drive_name’.

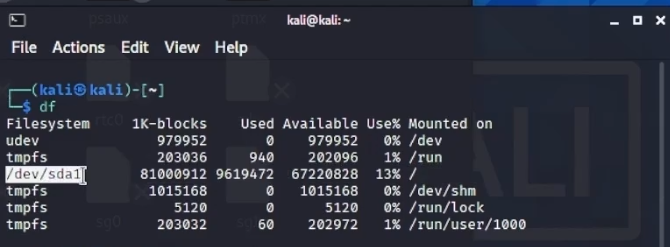
Also, if you need to know about all mountable file systems, you can refer to the ‘/etc/fstab’ file. To list all the mount points existing in your system, two useful commands are ‘df’ and ‘findmnt’.

Let’s see some of these aspects in action through terminal commands:

1. To list out all your drives and partitions, you can use:
ls /dev/sd*

2. To create a new partition:
fdisk /dev/sda

3. To mount a partition in the /mnt/your_drive_name directory:
mount /dev/sda2 /mnt/your_drive_name

4. To display all mount points:
df

or

findmnt

Understanding Linux Drives and Partitions

Linux might seem complicated at first glance, but once you understand the fundamental systems and conventions, it can become an efficient and flexible operating system to work with. This guide to Linux’s drives, partitions and directories should give you a headstart in navigating its landscapes. Happy exploring!

error: Content is protected !!