• May, Sat, 2022

FortiGate VM Trial license not working

Troubleshooting a FortiGate VM Trial License: A Step-by-Step Guide to Resolving the Issue

If you have been having trouble getting a FortiGate VM Trial license to work, then you are not alone. Many users have encountered this issue and have found it difficult to resolve. Fortunately, this article will provide you with the steps necessary to get your VM Trial license working properly. We will discuss the necessary steps for activating and validating your FortiGate VM Trial license as well as troubleshooting any issues that may arise during the process. By following these instructions, you should be able to get your FortiGate VM Trial license up and running in no time.
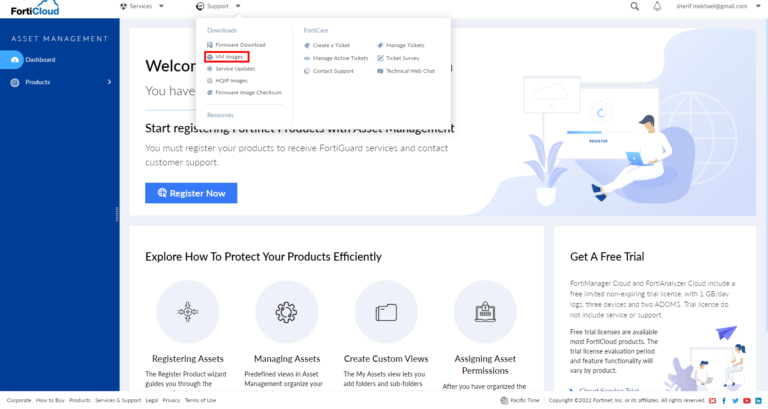
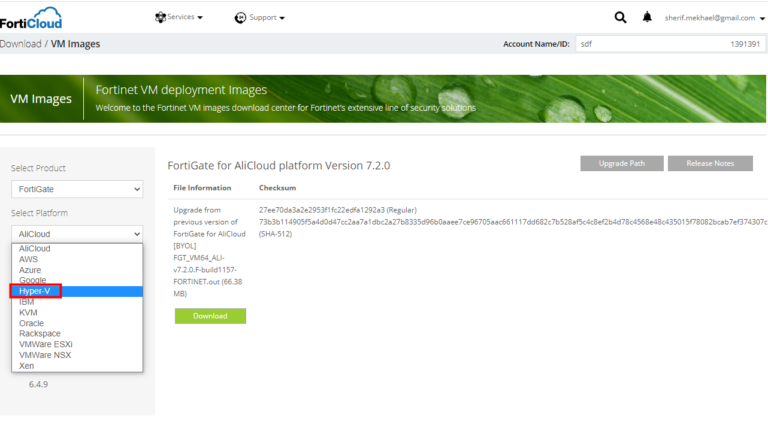
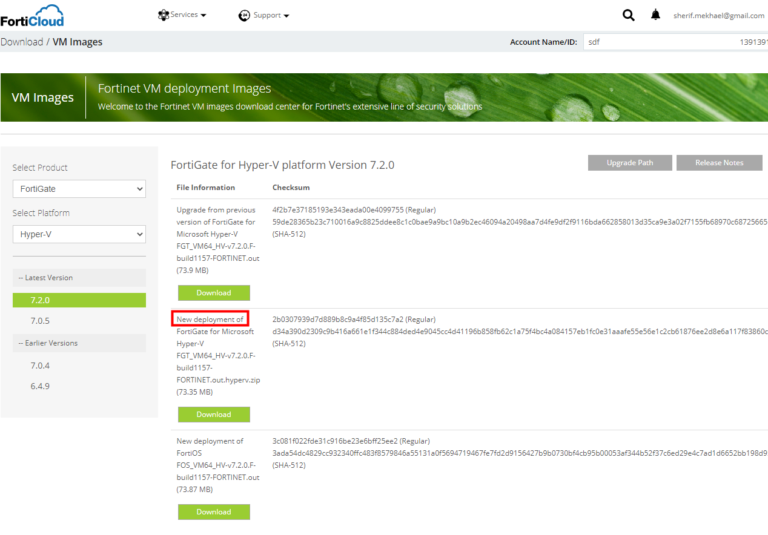
download-vm images
select Hyper-V
new-deployment
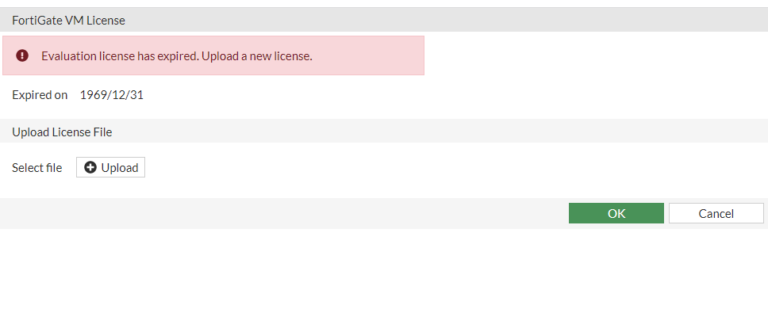
FortiGate VM Trial license not working

Understanding the FortiGate VM Trial License Limitations

Before troubleshooting, it’s crucial to understand the limitations of the evaluation license. The FortiGate Trial license does not support HTTPS for management, which means that you would have to manage it via HTTP.

Moreover, when the Fortigate default login is used, which is the admin, no password is required. After pressing enter, the firewall system forces you to set up a new password for better security.
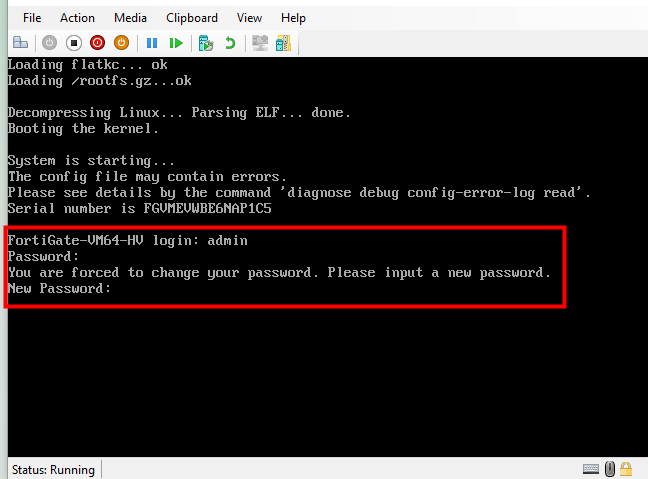
FortiGate_default username and password

Diagnosis: Identifying the VM License Issue

Often, the problem begins with your FortiGate VM trial license not working as expected.

To troubleshoot this, enter #execute factoryreset then type y. This action is aimed at restoring the factory settings and fixing the VM license issue.
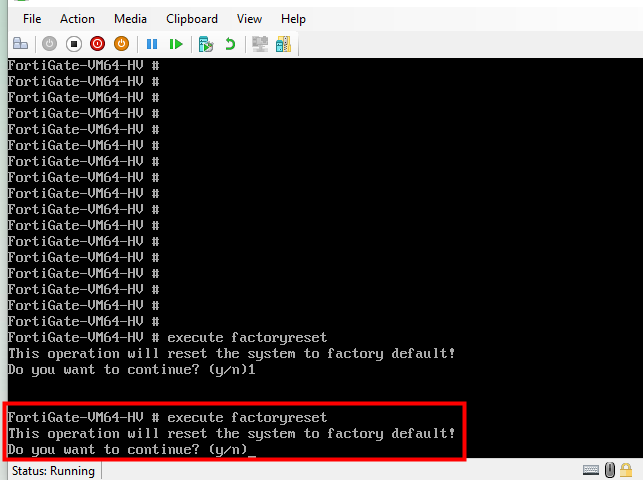
FortiGate_FactoryReset
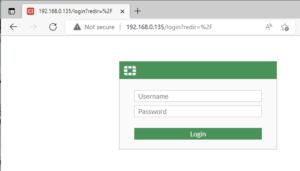
FortiGate Login

Setting up the initial configuration of a FortiGate Firewall.

To show the current IP address and the mode

#get system interface physical
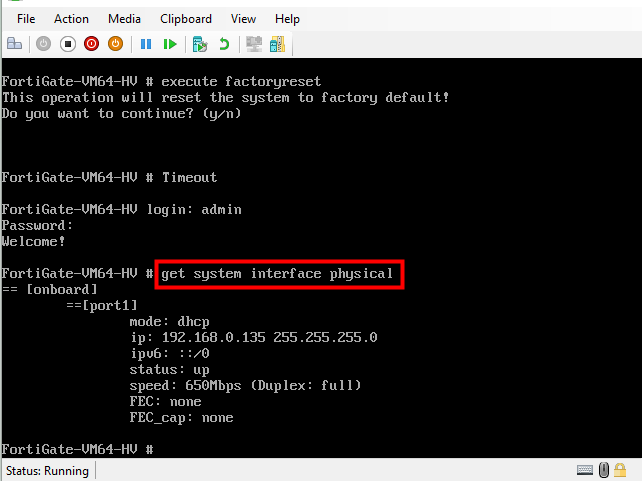
IP_DHCP

Configuring Network Settings

Next step: switch your network configuration to static and enter the IP address manually. Use the commands below to achieve this:

#config system interface

#show

To edit (configure) certain port number

#edit port1

#set mode static

#set ip 192.168.0.135 255.255.255.0

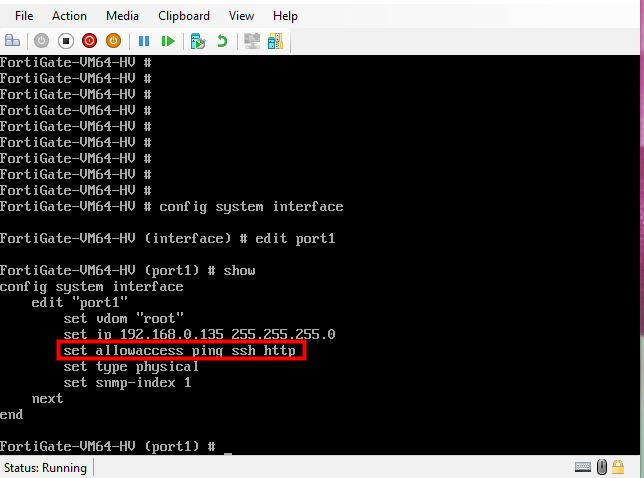
To access the firewall through that port, you must enable HTTP (included with the evaluation license). Upgrading to the full version will give you the added benefit of accessing the firewall via HTTPS and SSH as well.

The command for this is:

#set allowaccess http ssh ping https
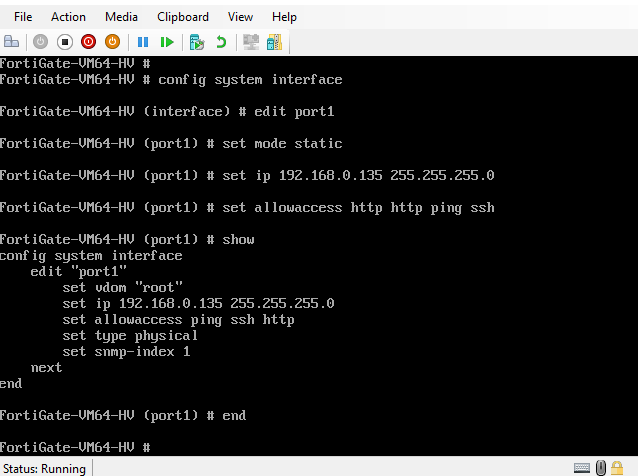
change IP to static
mode:static
allowaccess

Setting up Internet Access and DNS Serve

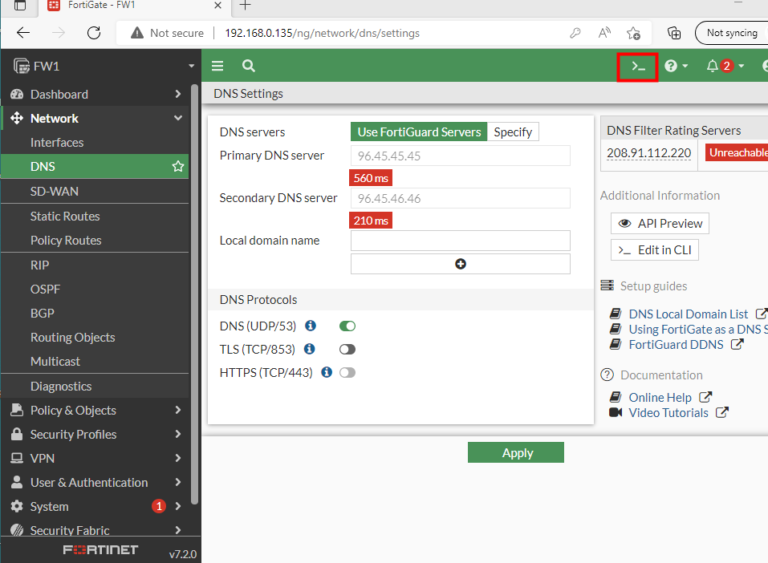
By default, the system utilizes Fortinet’s DNS servers. However, you have the flexibility to modify the DNS settings if required.

You need to set up a static default route to get an internet access route.

Network > Static Routes

By default, Fortinet‘s DNS servers are being used, but you can alter the DNS settings if desired.

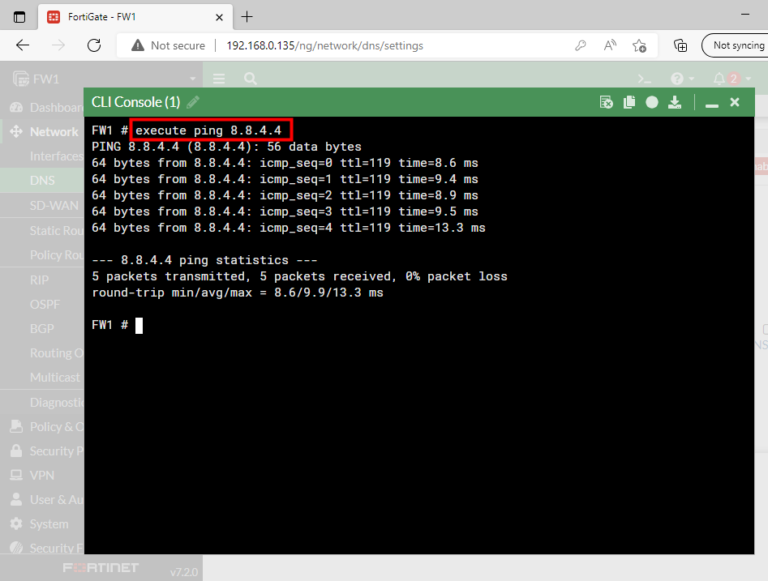
You can launch a new console window from the graphical user interface (GUI).

Concluding thoughts

Finally, it is important to note that a new console window can be launched from the graphical user interface (GUI) for more convenience.

In the end, while the FortiGate VM Trial license has its limitations, understanding and working around these constraints can allow you to explore the robust benefits of FortiGate VM and eventually make an informed decision about upgrading to the full version.
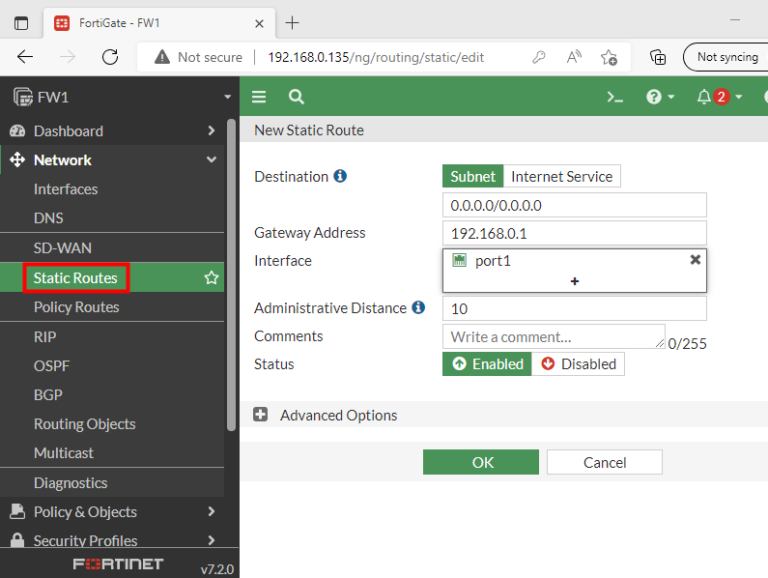
internet_access
DNS
console
  • May, Sat, 2022

Disable IE Enhanced Security Configuration

What steps do you need to take to turn off Internet Explorer Enhanced Security Configuration (ESC) for Photos?

disable IE Enhanced security in group policy

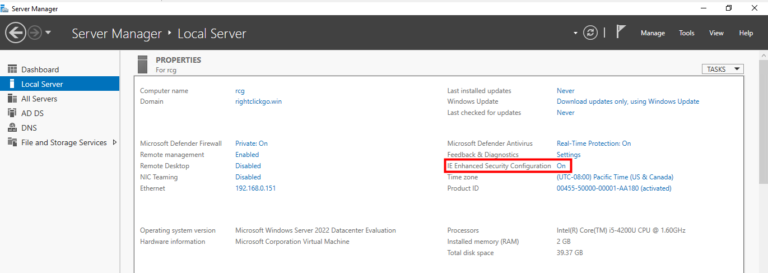
By default, Windows Servers have Internet Explorer Enhanced Security Configuration enabled to safeguard your domain controller from potential threats.

IE Enhanced Security Configuration

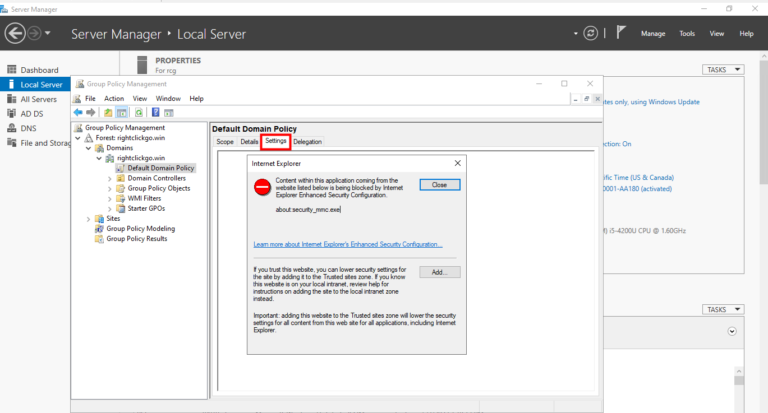
When attempting to modify settings in Group Policy Management, you receive the following message.

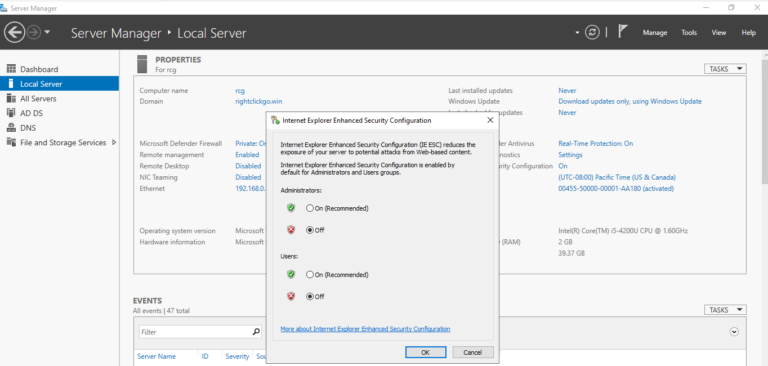
Disable IE Enhanced Security Configuration

Disable Internet Explorer Enhanced Security Configuration on Windows servers.

  • Apr, Wed, 2022

Hyper-V Nested Virtualization

Steps to Enable Hyper-V Nested Virtualization

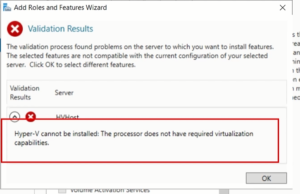
HyperV Nested virtualization is a feature that allows you to run Hyper-V inside of a HyperV virtual machine (VM). This feature requires the processor to have certain virtualization capabilities, and if the processor does not have these capabilities, you will get the errorthe processor does not have required virtualization capabilities. 

Hyper-V Nested Virtualization

This is usually because the processor does not support hardware virtualization, or the BIOS settings have not been enabled to allow virtualization. To fix this, you will need to enable hardware virtualization in the BIOS settings or upgrade the processor to one that supports virtualization.

This error indicates that your processor does not have the necessary virtualization capabilities, such as Intel‘s VTx technology or AMD‘s EPYC/Ryzen processor, to enable the performance and security benefits of modern virtualization products.

  • The Hyper-V guest that you want to install Hyper-V on must be running configuration version 8 or later.
  • The Hyper-V guest must be Windows Server 2016 (or later) / Windows 10 (or later).
  • VM guest must be off when you enable this capability.
  • On the guest machines, you do not have dynamic memory capabilities, only on the host machine.

Enable Nested Virtualization (on Host Machine)

Set-VMProcessor -VMName VMHost -ExposeVirtualizationExtensions $true 

The SetVMProcessor cmdlet is used to configure the processor settings of a virtual machine. TheVMName parameter specifies the name of the virtual machine to configure. TheExposeVirtualizationExtensions parameter specifies whether to expose virtualization extensions to the virtual machine. When set to $true, the virtual machine will be able to access the virtualization extensions.

Then start VM and install Hyper-V (VMHost does need to restart).

​Disable Nested Virtualization

Set-VMProcessor -VMName VMHost -ExposeVirtualizationExtensions $false

  • Apr, Sat, 2022

Manage Azure virtual machines

Know the different ways to manage your Azure Virtual Machine (With Photos).

Configure connections to Manage Azure Virtual Machines: RDP , SSH and Bastion.

RDP

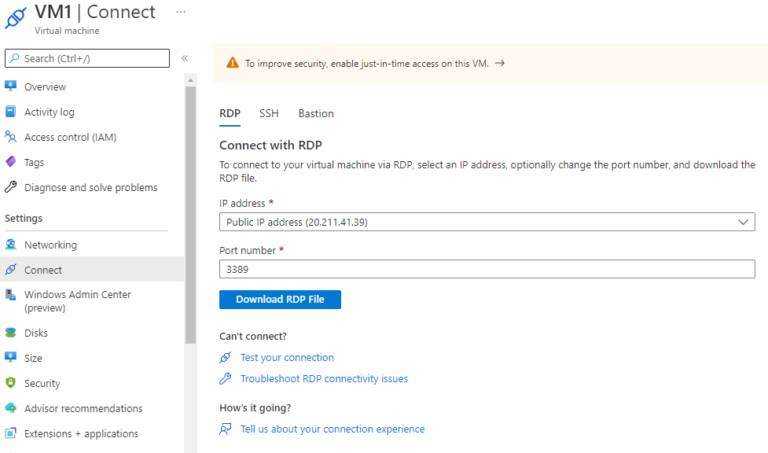
  • RDP connection uses TCP port 3389.
  • The first option when you connect to your VM in Azure.
  • Typically, RDP used in labs and on test machines.
  • RDP uses public IP address that hosted on Microsoft and these IP addresses are known to everyone because Microsoft published them every month so people can configure their firewalls to be able to communicate with various resources from Microsoft.
  • Deallocating the virtual machine (stopping it) will change the IP address the next you start it up time unless you are paying extra money for a static IP address. Normal reboot will not get a different IP address.
Manage Azure virtual machines
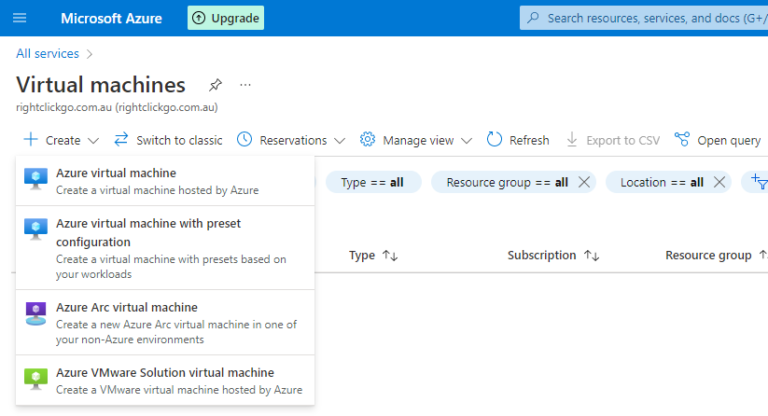
create vm
rdp connect 1
Download RDP File
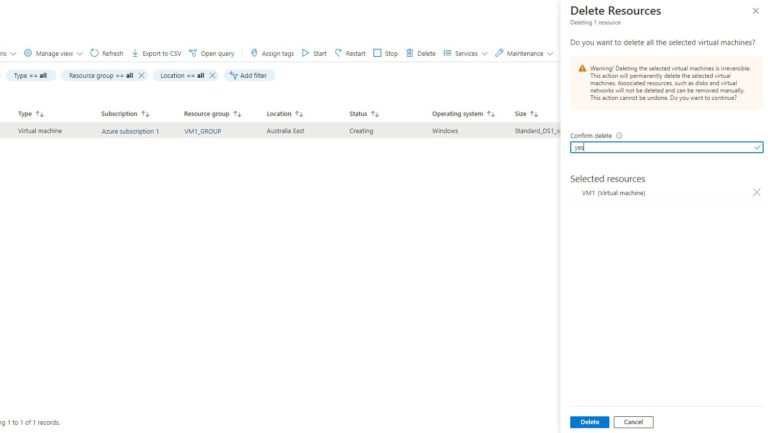
delete VM

SSH

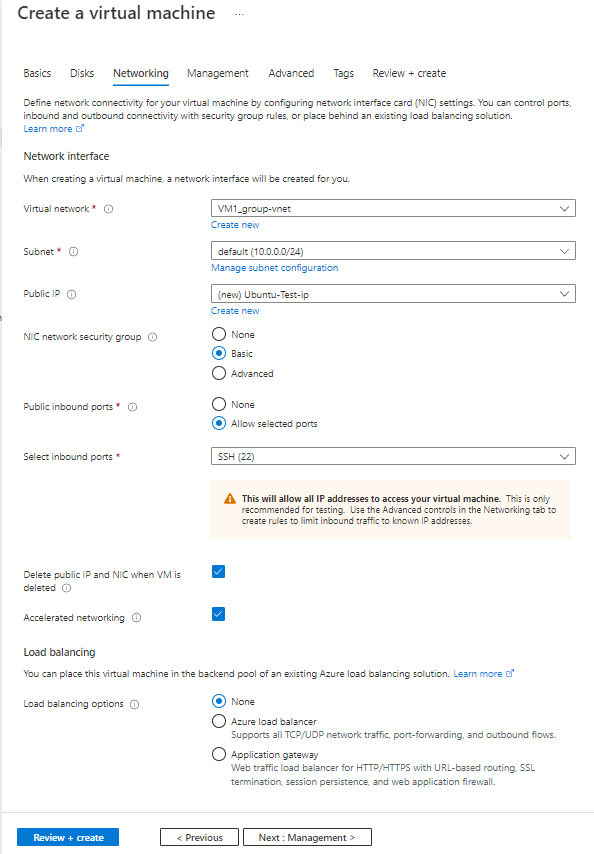
  • Uses TCP port 22.
  • Authentication type is going to be SSH public key which then generate a private key.
  • It’s going to be a self-signed certificate.
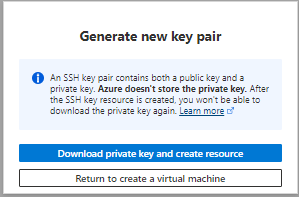
  • An important prompt will show up to generate a new key pair,Azure does not store the private key. You’re going to have to store that (this message will not appear again).
  • Download that private key (*.pem). 
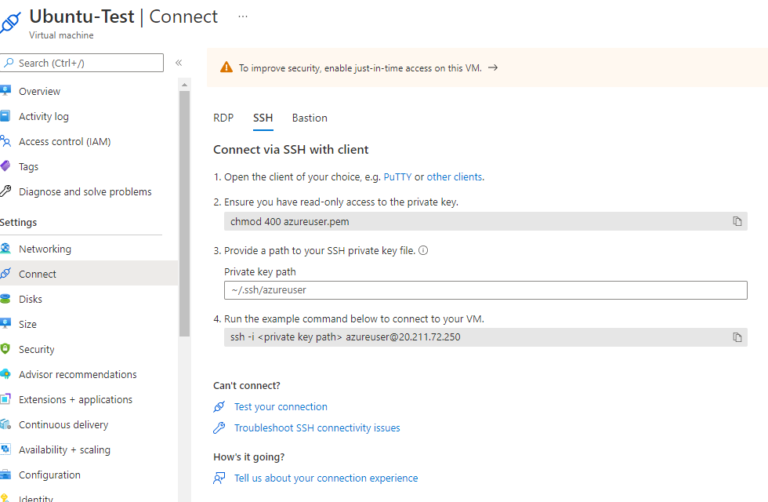
  • on the VM page itself, select connect from the left side and copy the given command to a clipboard.
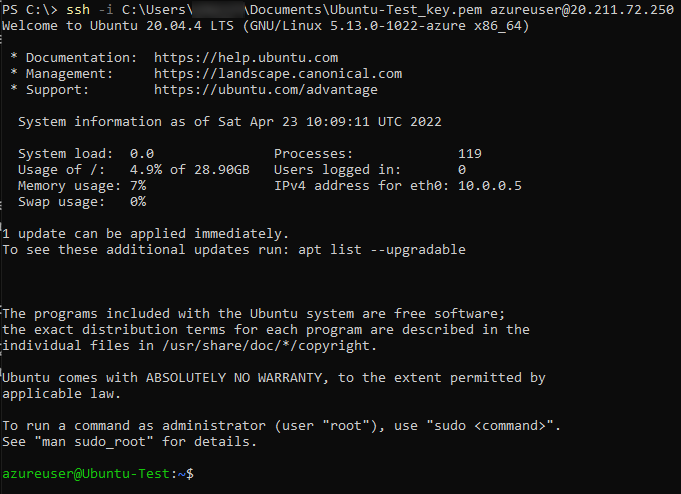
  • Open up a command prompt
  • The first time you make a connection you’re going to get a prompt saying that it cannot trust  the host at that IP address that you’re connecting to because it’s a self-signed certificate, type Yes (not Y for Yes).
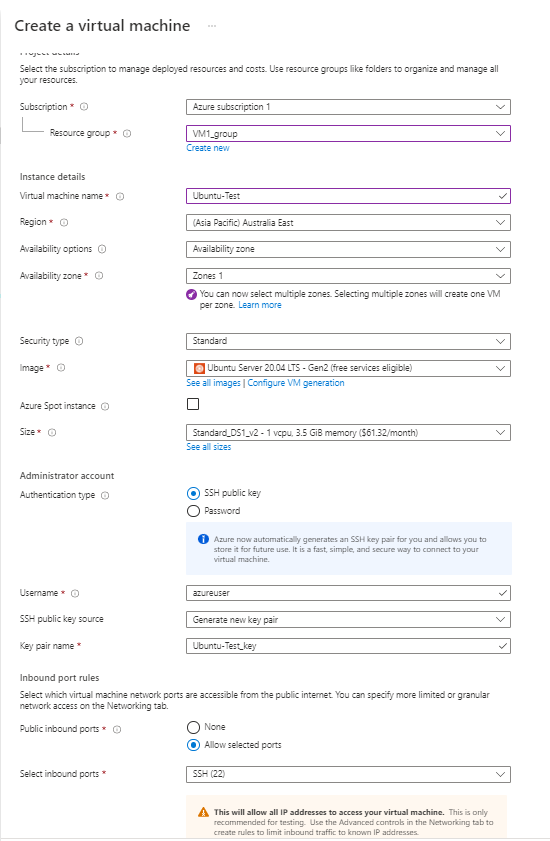
Create SSH VM
SSH Networking
SSH private key
SSH copy command
SSH cmd
SSH connection

Bastion

  • Because RDP connection is not very secure and your best option is to use Bastion host which still use a public IP address.
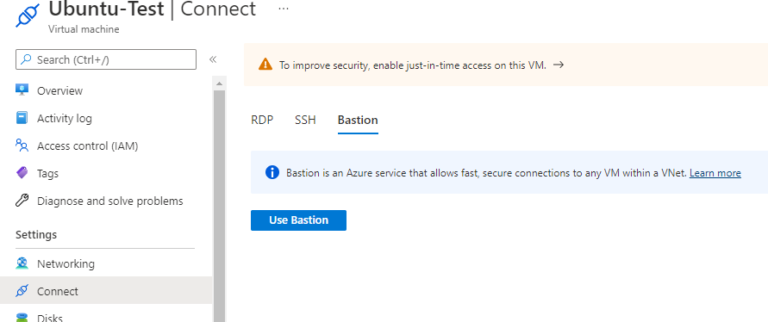
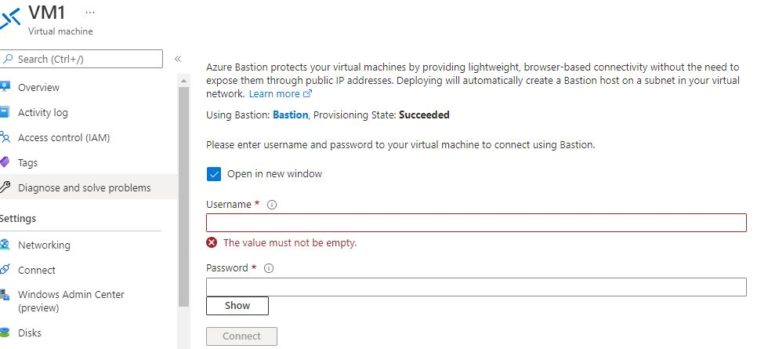
  • In VM page, select connect and choose Bastion.
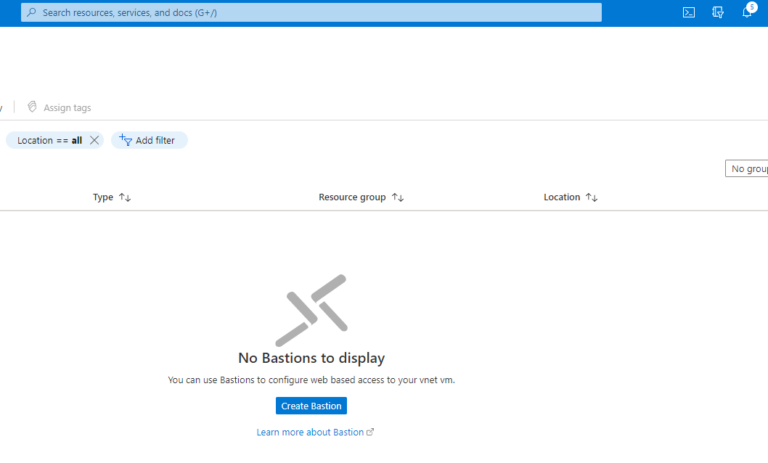
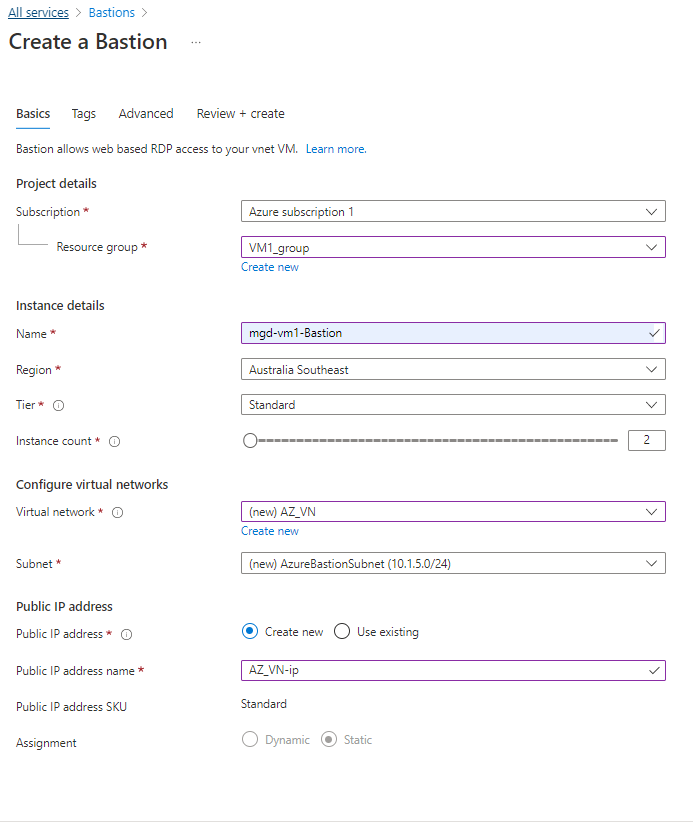
  • For the first time you can choose to configure Bastion automatically by selecting use Bastion button or choose to configure it manually by type bastion in the search . click Create Bastion.
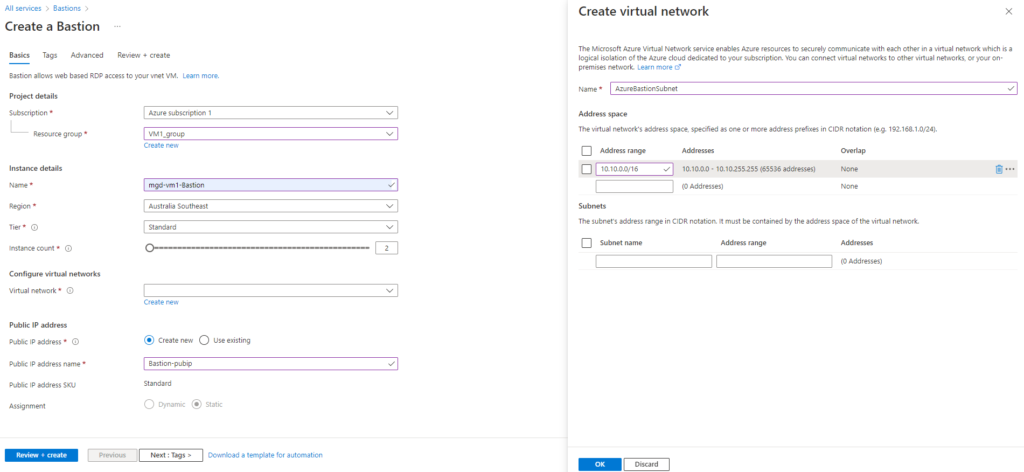
  • The subnet name must be named Azure Bastion Subnet, exactly.
use bastion
create bastion
create bastion 2
create bastion 3
Bastion
  • Mar, Tue, 2022

What could be causing my computer to run slowly?

Are you frustrated with your PC running slow and freezing up?

A computer is an electronic device that processes data and performs calculations at high speed. It is composed of several components, including a central processing unit (CPU), memory, storage, input/output (I/O) devices, and a motherboard. The CPU is the brain of the computer, responsible for executing instructions and performing calculations. Memory is used to store data and instructions for the CPU to access. Storage is used to store data and programs for long-term use. Input/output devices allow the user to interact with the computer, such as a keyboard, mouse, and monitor. The motherboard is the main circuit board of the computer, connecting all the components together.

 You are not alone. Many people experience this issue and it can be caused by a variety of factors. In this article, we will explore the most common causes of why your PC is running slow and freezing up, as well as some tips on how to fix the issue.

Why is my PC running slow? Freezes up?

There are a few potential causes that can lead to a decrease in your computer's performance. These can include things like

If your computer is running slowly, there are a few steps you can take to help speed it up.

  • Replace the hard drive with SSD (Solid State Drive).
  • Empty temp folder %localappdata%\Temp
  • Check for viruses and malware: Run a full system scan to detect and remove any malicious software that may be slowing down your computer.
  • Uninstall unused programs: Uninstall any programs that you no longer use to free up disk space and improve performance.
  • Update your operating system: Make sure you have the latest version of your operating system installed to ensure you have the latest security patches and bug fixes.
  • Clean up your hard drive: Delete any unnecessary files and folders to free up disk space and improve performance.
  • Add more RAM: Adding more RAM can help improve performance if your computer is running low on memory.
  • Disable startup programs: Disable any programs that start automatically when you turn on your computer to reduce the number of resources being used.
  • Defragmenting your hard drive: Defragmenting your hard drive can help improve performance by reorganizing the data on your hard drive.
  • Adjust your power settings: Adjust your power settings to ensure your computer is using the most efficient power plan.
  • Check for hardware issues: Check for any hardware issues that may be causing your computer to run slowly.
  • Mar, Sun, 2022

Configuring a Console Cable on MacOS

Learn how to configure a console cable on a MacOS Apple device to manage your network equipment.

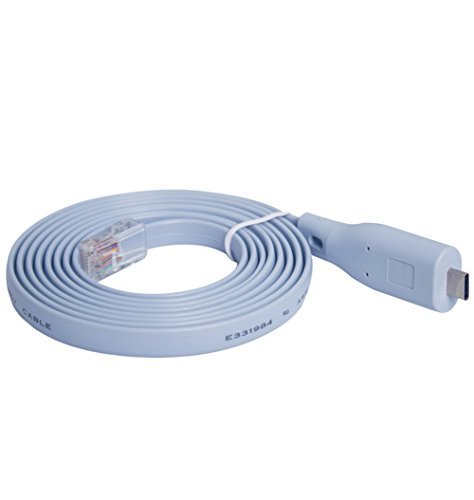
A console cable is a type of cable used to connect a computer or other device to a terminal or console port. It is typically used to access the command line interface of a device, such as a router, switch, or server. The cable is usually a serial cable with an RJ45 connector on one end and a DB9 or DB25 connector on the other. The cable is used to connect the device to a computer or laptop, allowing the user to access the command line interface of the device. Console cables are commonly used in networking and IT environments to configure and troubleshoot network devices.

console cable

MacOS is an operating system developed by Apple Inc. for its Macintosh line of computers. It is the successor to the classic Mac OS, which had been Apple‘s primary operating system since 1984. MacOS is designed to be easy to use and provides a wide range of features, including a graphical user interface, support for multiple users, and support for a variety of applications.

Screen Terminal is a free emulation program that can be used to manage your network devices, eliminating the need for paid software versions.

$ ls /dev

The command $ ls /dev is used to list the contents of the /dev directory. The /dev directory contains device files, which are special files that represent physical devices connected to the system. These device files can be used to access the devices, such as hard drives, printers, and USB devices.

$ ls /dev/*usb*

The commandls /dev/*usb* is used to list all files and directories in the ‘/dev directory that contain the stringusb‘. This command will list all files and directories that haveusb in their name, such asttyUSB0‘,usbmon0‘, andusbfs‘.

After connecting the USB-C cable, tty usb serial is the one that going to be used (driver will be detected automatically but in case it does show up, you need to download and install the driver).

21
22

$ screen /dev/tty.usbserial-DN05LN59 9600

the command is connecting to the serial port /dev/tty.usbserialDN05LN59 at a baud rate of 9600. This connection can be used to send and receive data from the serial port.

Screen command

Use screen command (you get different name/identifier in your device) with baud rate 9600.

  • Mar, Fri, 2022

Malware Types Explained: Examples and Prevention Tips

examples of malware

What are the most frequent types of malware?

  • Trojan: software that user installs, it looks like a gift but in the backdoor, it’s doing something else.
  • Virus: software that the user has interact with it to propagate to other hosts or other programs within a system.
  • Worm: self-propagating viruses. if it’s on your PC, it looks for more vulnerabilities and expand on its own without user interaction. consumes resources (memory and processing)
  • Polymorphic: (Poli -> Many) it appears different every time it activates, needs anti-malware/virus software that looking for a specific signature or pattern, if it’s changing every single time it executes, that’s hard to catch.
  • Armored. built in with structure that it’s hard to reverse engineer to check how it was created. 
  • Bot: little agent that runs on a computer. which can take instructions and do those things
  • Spyware: kind of malware that’s essentially looking at everything you’re doing, or can identify where you’re going and sends to a collection site.
  • Crypto-Malware:  pop up message that says “congratulations”. All your data is encrypted and you don’t have the key to decrypt it. Asking for money.
  • Rootkit: give you limited access to your systems, so hard to detect unless you have specific software that’s looking for that underlying rootkit. 
  • Botnet: Bot installed on a ton of computers then a hacker with a command communicates with them and run them to activate something malicious.
  • Ransomware: malware that holds your system and/or data hostage. Data is held hostage until you pay the ransom. spreads via phishing attacks

Useful links

How do Viruses Spread?

  • Removable media (Flash Drive).
  • Email attachments.
  • Files and Apps from the internet.

Viruses Best Practices

  • use updated anti-malware protected 
  • think twice before click or opening attachments/links
  • stay away from dangerous websites

Spyware Best Practices

  • Upgrade to the latest OS version.
  • Update your browser.
  • Use antimalware with spyware protection.

What Ransomware can do?

  • Block access to the system
  • Encrypt files so you can’t use them.
  • stop apps from working such as a browser or database from running
  • Destroy all files on the system.
  • Check the Map of worldwide ransomware attacks.

Spyware Best Practices

  • Think before you click a link.
  • Use spam filters.
  • Use antimalware protection
  • Back-up your sensitive data and files.


  • Mar, Fri, 2022

Ensure Your Site is Optimized for Mobile Devices

Do you have a mobile-friendly version of your website/webpage?

In this digital age, it is essential to make sure that your website is mobile responsive. A website that is not optimized for mobile devices can lead to poor user experience and reduced visibility on search engines. With the help of mobile responsive design, you can ensure that your website looks great on all devices, from smartphones to tablets. It also helps you provide a better user experience by making it easier for visitors to navigate your website and find the information they need quickly and easily. Furthermore, it improves your SEO rankings by making sure that search engine crawlers can properly index your website and display it in the right way on different devices.

Mobile-Friendly

Mobile optimization is the process of ensuring that a website or webpage is designed and developed to provide an optimal viewing and user experience on mobile devices. It involves making sure that the content, layout, and functionality of the website are optimized for mobile devices, such as smartphones and tablets.

Making sure your website is mobile-friendly is essential for providing an optimal user experience for your visitors. Here are some tips to ensure your website is mobile-friendly:

  1. Use Responsive Design: Responsive design is a web design approach that allows your website to adapt to the size of the users device. This ensures that your website looks great on any device, from desktop to mobile.
  2. Optimize Images: Images can take up a lot of space on a mobile device, so its important to optimize them for mobile. This means compressing images and using the correct file format.
  3. Use a MobileFriendly Nav: Utilize a hamburger menu or dropdown menu to make navigation easier for mobile users.
  4. Test your website on multiple devices to make sure it‘s mobilefriendly and provides an optimal user experience.

If you wish to conduct additional tests, please refer to the following links.

Check if your webpage is Mobile-Friendly.

Check how quickly your web page loads!

error: Content is protected !!