• Jul, Thu, 2023

Understanding Linux Drives and Partitions: A Simple Guide

An Introductory Guide to Linux Drives and Partitions

Linux, a highly-utilized open-source operating system, offers its unique way of handling drives and partitions, much differently than Windows and other operating systems. Essentially, what stands out is Linux’s unified file system where drives and resources appear as files. This ensures the naming conventions remain consistent regardless of how many drives, partitions, or directories there are.

If you have a single drive present, it will be represented as ‘/dev/sda’. Here, ‘sd’ signifies the ‘SCSI disk device’, while ‘a’ refers to the first device, hence drive 1. Similarly, if there is a second drive, it will be represented as ‘/dev/sdb’, where ‘b’ signifies that it is the second device, thus drive 2.

When it comes to partitions in Linux, they are recognized by appending a numeric value in the identifier. For instance, the first partition on your first drive would be displayed as ‘/dev/sda1’. If a second partition exists, it will be shown as ‘/dev/sda2’, and so on.

Fundamentals of Understanding Linux Drives and Partitions

Delimiters are fundamental in file paths; hence Linux uses the forward slash “/”, unlike Windows uses the backward slash “”. This forward slash helps divide the disk names and partition numbers, offering a clear view of your disk organization.

In Linux, the forward slash (‘/’) is used as a delimiter. Interestingly, unlike Windows, which uses a backward slash (”), Linux recognizes all resources as part of a Unified File System.

To access specific devices or partitions in your drive, Linux uses mounting. For instance, if you need to mount the second partition on the first drive, you can use the command ‘mount /dev/sda2 /mnt/your_drive_name’.

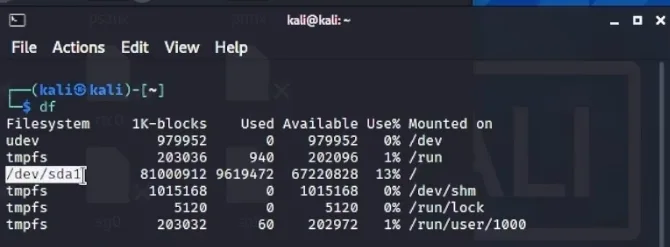
Also, if you need to know about all mountable file systems, you can refer to the ‘/etc/fstab’ file. To list all the mount points existing in your system, two useful commands are ‘df’ and ‘findmnt’.

Let’s see some of these aspects in action through terminal commands:

1. To list out all your drives and partitions, you can use:
ls /dev/sd*

2. To create a new partition:
fdisk /dev/sda

3. To mount a partition in the /mnt/your_drive_name directory:
mount /dev/sda2 /mnt/your_drive_name

4. To display all mount points:
df

or

findmnt
Understanding Linux Drives and Partitions

Linux might seem complicated at first glance, but once you understand the fundamental systems and conventions, it can become an efficient and flexible operating system to work with. This guide to Linux’s drives, partitions and directories should give you a headstart in navigating its landscapes. Happy exploring!


  • Jul, Sat, 2022

Server Definition and Purpose

Server Definition and Purpose

What is a Server? Definition & Purpose

Hardware characteristics of a server.

  • Server computer is more powerful than workstations (some workstations are very powerful such as high-end gaming PCs)
  • Processor: multiple processors (each one also has more cores), very expensive.
  • RAM: can be Terabytes in size as they serve many connections at the same time,
  • Storage : Terabytes or Petabytes
  • Network Interface Cards (NIC): is going to be wired not wireless
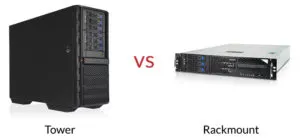
  • Form Factor : Rack unit or Tower case.
  • Servers are expensive because they have more resources included.
  • They’re often without a keyboard or a mouse and can be remotely accessed.
  • have a higher Service Level Agreement or SLA to guarantee they are up and running most of the time.

What is the main purpose and use of a server?

 
tower and rackmount servers

  • May, Sat, 2022

Disable IE Enhanced Security Configuration

What steps do you need to take to turn off Internet Explorer Enhanced Security Configuration (ESC) for Photos?

disable IE Enhanced security in group policy

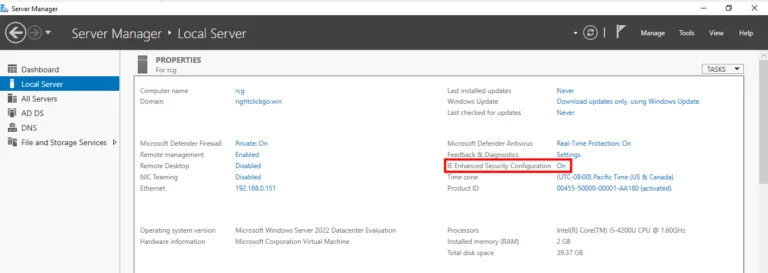
By default, Windows Servers have Internet Explorer Enhanced Security Configuration enabled to safeguard your domain controller from potential threats.

IE Enhanced Security Configuration

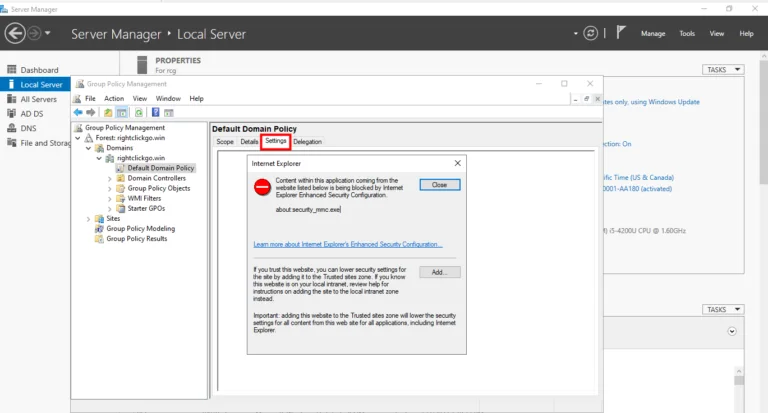
When attempting to modify settings in Group Policy Management, you receive the following message.

Disable IE Enhanced Security Configuration

Disable Internet Explorer Enhanced Security Configuration on Windows servers.

  • Go into Server Manager
  • Click on Local Server
  • Navigate to the IE Enhanced Security Configuration section
  • Turn it Off for the relevant users, then OK.
  • Apr, Wed, 2022

Hyper-V Nested Virtualization

Steps to Enable Hyper-V Nested Virtualization

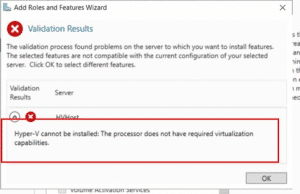
Hyper-V Nested virtualization is a feature that allows you to run Hyper-V inside of a Hyper-V virtual machine (VM). This feature requires the processor to have certain virtualization capabilities, and if the processor does not have these capabilities, you will get the error “the processor does not have required virtualization capabilities”. 

Hyper-V Nested Virtualization

This is usually because the processor does not support hardware virtualization, or the BIOS settings have not been enabled to allow virtualization. To fix this, you will need to enable hardware virtualization in the BIOS settings or upgrade the processor to one that supports virtualization.

This error indicates that your processor does not have the necessary virtualization capabilities, such as Intel’s VT-x technology or AMD’s EPYC/Ryzen processor, to enable the performance and security benefits of modern virtualization products.

  • The Hyper-V guest that you want to install Hyper-V on must be running configuration version 8 or later.
  • The Hyper-V guest must be Windows Server 2016 (or later) / Windows 10 (or later).
  • VM guest must be off when you enable this capability.
  • On the guest machines, you do not have dynamic memory capabilities, only on the host machine.

Enable Nested Virtualization (on Host Machine)

Set-VMProcessor -VMName VMHost -ExposeVirtualizationExtensions $true 

The Set-VMProcessor cmdlet is used to configure the processor settings of a virtual machine. The -VMName parameter specifies the name of the virtual machine to configure. The -ExposeVirtualizationExtensions parameter specifies whether to expose virtualization extensions to the virtual machine. When set to $true, the virtual machine will be able to access the virtualization extensions.

Then start VM and install Hyper-V (VMHost does need to restart).

​Disable Nested Virtualization

Set-VMProcessor -VMName VMHost -ExposeVirtualizationExtensions $false

  • Apr, Sat, 2022

Manage Azure virtual machines

Know the different ways to manage your Azure Virtual Machine (With Photos).

Configure connections to Manage Azure Virtual Machines: RDP , SSH and Bastion.

RDP

  • RDP connection uses TCP port 3389.
  • The first option when you connect to your VM in Azure.
  • Typically, RDP used in labs and on test machines.
  • RDP uses public IP address that hosted on Microsoft and these IP addresses are known to everyone because Microsoft published them every month so people can configure their firewalls to be able to communicate with various resources from Microsoft.
  • Deallocating the virtual machine (stopping it) will change the IP address the next you start it up time unless you are paying extra money for a static IP address. Normal reboot will not get a different IP address.

Manage Azure virtual machines
create vm
rdp connect 1
Download RDP File
delete VM

SSH

  • Uses TCP port 22.
  • Authentication type is going to be SSH public key which then generate a private key.
  • It’s going to be a self-signed certificate.
  • An important prompt will show up to generate a new key pair,Azure does not store the private key. You’re going to have to store that (this message will not appear again).
  • Download that private key (*.pem). 
  • on the VM page itself, select connect from the left side and copy the given command to a clipboard.
  • Open up a command prompt
  • The first time you make a connection you’re going to get a prompt saying that it cannot trust  the host at that IP address that you’re connecting to because it’s a self-signed certificate, type Yes (not Y for Yes).

Create SSH VM
SSH Networking
SSH private key
SSH copy command
SSH cmd
SSH connection

Bastion

  • Because RDP connection is not very secure and your best option is to use Bastion host which still use a public IP address.
  • In VM page, select connect and choose Bastion.
  • For the first time you can choose to configure Bastion automatically by selecting use Bastion button or choose to configure it manually by type bastion in the search . click Create Bastion.
  • The subnet name must be named Azure Bastion Subnet, exactly.

use bastion
create bastion
create bastion 2
create bastion 3
Bastion